
SQL基础操作 Oracle模式
本节主要介绍 TDSQL PG 在Oracle模式下的SQL基本操作。
连接数据库
获取数据库连接配置信息,登录数据库系统:
- 登录TDSQL管理平台在左侧选择 实例管理 并点击需要登录的实例,进入 节点管理 页(分布式下选择 CN 页,集中式选择 DN 页)。
- 选择需要登录的节点IP,鼠标悬停在其右侧
 图标获得环境配置信息。
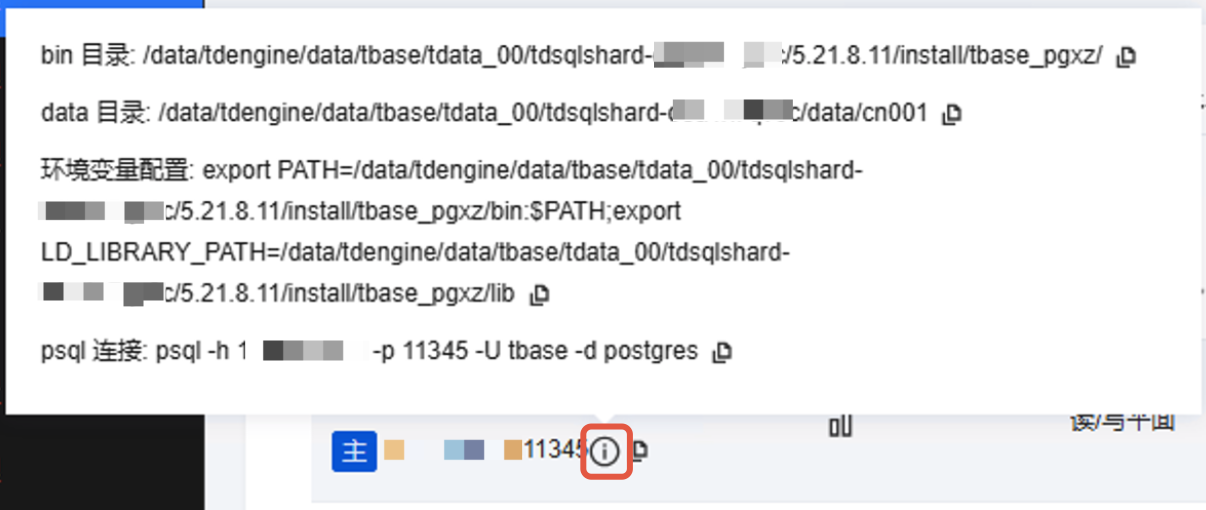
- 登录数据库节点服务器,切换到tbase用户并使用上述的export命令设置环境变量。
 图标获得环境配置信息。
su - tbase
export PATH=/data1/tdengine/data/tbase/tdata_00/tdsqlshard-o62xkfw1a0/5.21.8.11/install/tbase_pgxz/bin:$PATH;
export LD_LIBRARY_PATH=/data1/tdengine/data/tbase/tdata_00/tdsqlshard-o62xkfw1a0/5.21.8.11/install/tbase_pgxz/lib
- 在本机使用psql命令连接数据库(tbase用户一般只用于本机登录,可以创建普通用户用于业务开发)。
注意:
是连接到cn节点(后面没特别说明,所有数据库操作都是连接到cn节点)。
psql -h database_host_ip -p 11345 -U tbase -d postgres
创建用户
TDSQL PG可以用CREATE USER创建一个用户,需要使用超级用户或者具有CREATEROLE权限的用户(比如:tbase)。
- 示例:使用
create user创建用户并指定密码。
postgres=# create user mgr password 'mypassword';
CREATE ROLE
创建完成后,使用\du 展示用户信息。
postgres=# \du mgr
           List of roles
 Role name | Attributes | Member of
-----------+------------+-----------
 mgr       |            | {}
可以使用ALTER USER重新设置用户密码。
postgres=# alter user mgr password 'newpassword';
ALTER ROLE
启用Oracle兼容特性
TDSQL PG内核引擎会根据数据库类型来区分Oracle 兼容模式与PG 模式。
在创建数据库的时候使用sql mode``db_mode 关键字即可创建一个指定模式的数据库,db_mode可选oracle或postgresql。不指定即默认PostgreSQL模式。
示例:
postgres=# create database ora sql mode oracle;
CREATE DATABASE

postgres=# \l ora
                                List of databases
 Name | Owner | Encoding | Sqlmode |  Collate   |   Ctype    | Access privileges
------+-------+----------+---------+------------+------------+-------------------
 ora  | tbase | UTF8     | oracle  | en_US.utf8 | en_US.utf8 |
(1 row)

postgres=# create database pg_db;
CREATE DATABASE
postgres=# \l pg_db
                                 List of databases
 Name  | Owner | Encoding | Sqlmode  |  Collate   |   Ctype    | Access privileges
-------+-------+----------+----------+------------+------------+-------------------
 pg_db | tbase | UTF8     | postgres | en_US.utf8 | en_US.utf8 |
(1 row)
可以看到 ora 数据库的 Sqlmode 列显示 oracle,即表示 ora 数据库当前为 Oracle 模式。
而 pg_db 数据库的 Sqlmode 列显示 postgres,即表示 pg_db 数据库当前为 PostgreSQL 模式。
接下来切换至 ora 数据库或者直接访问 ora 数据库即可使用Oracle模式。
\c ora
或:
psql -h your_server_ip -p your_server_port -U tbase -d ora
创建模式
- 标准语句。
ora=# create schema tbase_ora;
CREATE SCHEMA
- 扩展语法,不存在时才创建。
ora=# create schema if not exists tbase_ora;
NOTICE:  schema "TBASE_ORA" already exists, skipping
CREATE SCHEMA
表操作
创建表
使用命令create table创建表
- 不用指定shard key建表,系统默认使用第一个字段做为表的shard key
create table shared_col_table(id serial not null,nickname text);
- 指定shard key建表
create table t_appoint_col(id serial not null,nickname text) distribute by shard(nickname);
注意:
分布键选择原则
- v5.21.x支持多列分布键
- 如果有主键,则选择主键做分布键
- 如果主键是复合字段组合,则选择过滤性好的字段做分布键
- 没有主键的可以使用UUID来做分布键
- 让数据尽可能的分布得足够散
- 表不存在时才创建
create table IF NOT EXISTS t(id int,mc text);
查看表
使用\d命令查看表
ora=# \d t_appoint_col;
                             Table "public.T_APPOINT_COL"
  Column  |  Type   | Collation | Nullable |                  Default
----------+---------+-----------+----------+-------------------------------------------
 ID       | INTEGER |           | not null | NEXTVAL('T_APPOINT_COL_ID_SEQ'::REGCLASS)
 NICKNAME | TEXT    |           |          |
使用Oracle兼容特性
使用层次查询获取数据
ora=# create table ora_table(a int, b int);
CREATE TABLE
ora=# insert into ora_table values(1, 2);
INSERT 0 1
ora=# insert into ora_table values(1, 2);
INSERT 0 1
ora=# select * from ora_table connect by level < 2;
 A | B
---+---
 1 | 2
 1 | 2
(2 rows)
使用ROWNUM对行进行编号
ora=# select rownum, a, b from ora_table where rownum = 1;
 ROWNUM | A | B
--------+---+---
      1 | 1 | 2
(1 row)
修改表
使用命令alter table修改表
示例:
- 修改表名
alter table t rename to tbase;
- 增加表字段
alter table tbase add column age integer;
- 修改字段类型
alter table tbase alter column age type float8;
- 修改表所属模式
alter table tbase set schema public;
删除表
使用命令drop table删除表
示例:当表存在时删除
drop table if exists tbase;
索引操作
创建索引
使用命令create index创建索引
示例:
- 创建唯一索引
create table t_first_col_share(id serial not null,nickname text);
create unique index t_first_col_share_id_uidx on t_first_col_share using btree(id);
注意:
非shard key字段不能建立唯一索引
- 创建多字段索引
create table t_mul_idx (f1 int,f2 int,f3 int,f4 int);
create index t_mul_idx_idx on t_mul_idx(f1,f2,f3);
查看索引
- 使用
\d命令查看索引。
ora=# \d t_first_col_share;
                             Table "public.T_FIRST_COL_SHARE"
  Column  |  Type   | Collation | Nullable |                    Default
----------+---------+-----------+----------+-----------------------------------------------
 ID       | INTEGER |           | not null | NEXTVAL('T_FIRST_COL_SHARE_ID_SEQ'::REGCLASS)
 NICKNAME | TEXT    |           |          |
Indexes:
    "T_FIRST_COL_SHARE_ID_UIDX" UNIQUE, btree (ID) WITH (checksum='on')
- 使用
\di命令查看索引
ora=# \di
                           List of relations
 Schema |           Name            | Type  | Owner |       Table
--------+---------------------------+-------+-------+-------------------
 public | T_FIRST_COL_SHARE_ID_UIDX | index | tbase | T_FIRST_COL_SHARE
 public | T_MUL_IDX_IDX             | index | tbase | T_MUL_IDX
(2 rows)
- 使用
user_indexes视图列出索引
ora=# select INDEX_NAME from user_indexes where table_name='T_FIRST_COL_SHARE';
        INDEX_NAME
---------------------------
 T_FIRST_COL_SHARE_ID_UIDX
(1 row)
删除索引
使用命令DROP INDEX删除索引
drop index t_first_col_share_id_uidx;
插入数据
insert用于向一张表中插入数据,期望插入的数据可以是一条,多条或者是一个select查询的结果集。
使用INSERT INTO...命令插入数据
- 创建表
tbase并插入一行数据:
ora=# create table tbase(id serial not null,nickname text) distribute by shard(id);
CREATE TABLE
ora=# insert into tbase(id,nickname) values(1,'hello TDSQL PG');
INSERT 0 1
- 向表
tbase插入多行数据:
ora=# insert into tbase(id,nickname) values(2,'TDSQL PG'),(3,null),(4,'TDSQL PG good');
COPY 3
ora=# select * from tbase;
 ID |    NICKNAME
----+----------------
  1 | hello TDSQL PG
  2 | TDSQL PG
  3 |
  4 | TDSQL PG good
(4 rows)
删除数据
delete用于删除表数据,可以全部删除或者部分删除。
- 示例,带条件删除:
ora=# select * from tbase;
 ID |    NICKNAME
----+----------------
  1 | hello TDSQL PG
  3 |
  4 | TDSQL PG good
  2 | TDSQL PG
(4 rows)

ora=# delete from tbase where id=4;
DELETE 1
- 示例,null条件的表达方式
ora=# delete from tbase where nickname is null;
DELETE 1
ora=# select * from tbase;
 ID |    NICKNAME
----+----------------
  1 | hello TDSQL PG
  2 | TDSQL PG
(2 rows)
更新数据
update用于更新表数据,可以更新一个字段或者多个字段。
ora=# update tbase set nickname ='Hello TDSQL PG' where id=1;
UPDATE 1
查询数据
select用于从一张表或视图中获取数据。
使用select ... from ...命令查询数据
- 创建
t_grouping表并插入内容
create table t_grouping(id int,dep varchar(20),product varchar(20),num int);
insert into t_grouping values(1,'dept no1','phone',90);
insert into t_grouping values(2,'dept no1','computer',80);
insert into t_grouping values(3,'dept no1','phone',70);
insert into t_grouping values(4,'dept no2','computer',60);
insert into t_grouping values(5,'dept no2','phone',50);
insert into t_grouping values(6,'dept no2','computer',60);
insert into t_grouping values(7,'dept no3','phone',70);
insert into t_grouping values(8,'dept no3','computer',80);
insert into t_grouping values(9,'dept no3','phone',90);
- 查询
t_grouping表所有内容
ora=# select * from t_grouping;
 ID |   DEP    | PRODUCT  | NUM
----+----------+----------+-----
  1 | dept no1 | phone    |  90
  2 | dept no1 | computer |  80
  5 | dept no2 | phone    |  50
  6 | dept no2 | computer |  60
  8 | dept no3 | computer |  80
  9 | dept no3 | phone    |  90
  3 | dept no1 | phone    |  70
  4 | dept no2 | computer |  60
  7 | dept no3 | phone    |  70
(9 rows)
- 按dep,product汇总,排序展示
ora=# select dep,product,sum(num) from t_grouping group by dep,product order by dep,product;
   DEP    | PRODUCT  | SUM
----------+----------+-----
 dept no1 | computer |  80
 dept no1 | phone    | 160
 dept no2 | computer | 120
 dept no2 | phone    |  50
 dept no3 | computer |  80
 dept no3 | phone    | 160
(6 rows)
- 带条件查询
ora=# select * from t_grouping where dep='dept no2';
 ID |   DEP    | PRODUCT  | NUM
----+----------+----------+-----
  5 | dept no2 | phone    |  50
  6 | dept no2 | computer |  60
  4 | dept no2 | computer |  60
(3 rows)
提交事务
事务提交用于保存对数据库的更改命令。
命令如下:COMMIT; 或者COMMIT TRANSACTION;
例:
insert into tbase(id,nickname) values(5,'hello new TDSQL PG');
BEGIN;
delete from tbase where id=5;
COMMIT;
注意:
在COMMIT执行之前,tbase表中id为5的记录会被另一会话查询到。
回滚事务
事务回滚用于撤销尚未保存到数据库的命令。
命令语法如下:ROLLBACK; 或者 ROLLBACK to savepoint_name;
例1:
BEGIN;
delete from tbase where id in (1,2);
select * from tbase;
ROLLBACK;
select * from tbase;
注意:
在ROLLBACK执行之后,事务对数据的删除不会保存到数据库中。
例2:
BEGIN;
delete from tbase where id =1;
select * from tbase;
savepoint A;
delete from tbase where id =2;
select * from tbase;
ROLLBACK to A;
COMMIT;
注意:
在ROLLBACK to A;执行之前同一进程查询不到id为1和2的数据。回滚到保存点之后,id为2数据可查询到。ROLLBACK to savepoint_name;不会结束事务,需使用COMMIT;提交事务。